Blogs, Newsletters, PDF
Top 5 Exercises to Relieve Lower Back Pain at Home
July 9, 2025

(And How to Know Which Ones Are Right for You) Lower back pain is incredibly common. In fact, it’s the leading cause of disability worldwide. If you’re struggling with back pain, you’re not alone. But here’s the tricky part: back pain often responds very differently from person to person. That means there really isn’t a
Don’t Lose What Matters Most: Protecting Muscle During Weight Loss
June 17, 2025

You’ve probably heard of medications like Ozempic, Wegovy, or Mounjaro. Originally created for diabetes management, these drugs have quickly become popular tools for weight loss. And for many people, they’ve made a big difference—helping to curb appetite, lower blood sugar, and shed pounds. But there’s something you may not have heard about: Up to one-third of the weight
Ice or Heat? What the Latest Research Says About Pain Relief and Recovery
June 9, 2025

One of the most common questions we hear at New Life Physical Therapy is: Should I use ice or heat? For years, ice has been the standard recommendation immediately following an injury—but emerging research is shifting that perspective. While ice can still offer temporary pain relief in the short term, new findings show that heat,
What I Learned from My Gallbladder Surgery: Recovery Tips That Help After Any Surgery
June 3, 2025

By Mary Rose Strickland, PT, DPT, OCS As a physical therapist, I’ve helped hundreds of people navigate post-surgical recovery. But recently, I became the patient. I underwent gallbladder surgery, and while it went well, it gave me a fresh perspective—and a renewed sense of empathy—for what my patients go through. This isn’t just about gallbladder
Why 3D Movement Matters: Training, Stretching, and Strengthening for Real Life
March 18, 2025

When it comes to movement, our bodies don’t operate in a single direction. Every step we take, every squat, twist, and reach we make involves movement in three planes: Sagittal plane (forward and backward movement) Frontal plane (side-to-side movement) Transverse plane (rotational movement) At New Life Physical Therapy, we focus on 3D strength and movement
Why Drinking Water is Essential for Weight Loss
March 11, 2025

When it comes to weight loss, most people focus on diet and exercise—which are, of course, important. But one of the simplest and most overlooked factors in successful weight loss is water intake. Drinking enough water isn’t just about staying hydrated; it directly impacts metabolism, appetite control, and fat loss. If you’re trying to shed
Why “Dr. Google” (and Even AI) Isn’t Always the Best for Musculoskeletal Pain
March 8, 2025

In today’s digital world, we have information at our fingertips 24/7. If you have a question—about anything—chances are, Google (or AI) has an answer. While this can be helpful in many areas of life, when it comes to musculoskeletal pain, relying on “Dr. Google” (or even AI) isn’t always the best idea. The Problem with
Kickstart Your Weight Loss Journey: The Power of a Food Diary
February 25, 2025

Embarking on a weight loss journey can feel overwhelming, but one of the simplest and most effective first steps is keeping a food diary. By recording everything you eat and drink with as much detail and accuracy as possible, you lay the groundwork for informed, mindful eating habits that can lead to lasting change. The
Featured Posts
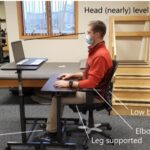
Working From Home? Why You Should Check The Ergonomics of Your Workspace
October 4, 2022
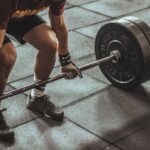
Why Everyone Should Deadlift
May 3, 2023

How Stress May Be Sabotaging Your Weight Loss Efforts
April 18, 2023

Macronutrients: Introduction
February 2, 2023
Choose your E-book